
In this tutorial, we will explore the fundamentals of creating a WordPress plugin. Our plugin will be straightforward, as it will enable injecting code (JS, CSS, etc.) into the header and/or footer (useful, among other things, for implementing Google Analytics).
Why create a WordPress plugin?
Plugins are essential for unlocking the full potential of WordPress and extending its basic functionality.
There are plugins available for almost everything! However, sometimes we may not find exactly what we need, or the desired functionality may only be available in premium versions. That’s why it can be beneficial to create a custom plugin tailored to our specific needs or even modify existing ones.
The foundation for creating a plugin
A plugin can be as simple as a PHP file with the WordPress plugin header!
At a minimum, the header should contain the name of the plugin:
<?php
/**
 * Plugin Name: Basic Headers And Footers
*/
?>
And there you have it, with this simple file, you have created a WordPress plugin!
In practice, we add a few additional fields:
/**
 * Plugin Name: Basic Headers And Footers
 * Plugin URI: https://github.com/cyrilbois/wp-plugin-basic-headers-and-footers
 * Description: Allows you to insert script or CSS in the header or footer.
 * Version: 1.0.0
 * Author: Cyril Bois
 * Author URI: https://github.com/cyrilbois
*/
Refer to the documentation to find the comprehensive list of fields for the WordPress plugin header.
Simply place this PHP file in the wp-content/plugins folder of your WordPress installation, and it will appear in the available plugins!

Well, it’s true, for now, our plugin doesn’t do much… in fact, it does nothing!
In practice, we create a folder to house our plugin because it’s rare for a plugin to be limited to just one PHP file. In our case, we’ll create a folder called /basic-headers-and-footers/ and place our PHP file basic-headers-and-footers.php inside it. Note: The name of the PHP file is not important; it’s the WordPress header that indicates the main file of our plugin.
Creating an Administration Page in WordPress
We will create a configuration page in the WordPress dashboard to input the headers and footers to be injected.
Creating a Submenu
Before creating the view, we need to add an entry in the menu to make our configuration page accessible. We will add a submenu under the “Settings” menu:

To achieve this, we need to utilize the WordPress “Hooks” system. This allows us to intercept certain actions in WordPress. We can execute custom code (action hooks) or modify values (filter hooks).
We will use the “add_action” function to intercept the creation of the administration menu:
add_action('admin_menu', 'adminMenu');The “admin_menu” hook allows us to customize the WordPress dashboard menu.
The adminMenu function will be executed when the administration menu is created.
function adminMenu() {
	// The "add_submenu_page" function is used to create a submenu
	add_submenu_page( 'options-general.php', // Specify where to place our submenu
		'Basic headers and footers', // Title of our configuration page
		'Basic headers and footers', // Label of our submenu
		'manage_options', // Required capabilities to display our submenu
		'basic-headers-and-footers', // Unique identifier for our submenu
		'adminPanel' // Function executed to generate our configuration page
	);
}
And there you have it, we have already added a submenu!
Create a Configuration View
Now that we have added a submenu, we can create our configuration page. This page should allow us to view and modify the headers/footers to be injected.
We will put our view in a dedicated PHP file, /views/panel.php, to facilitate the maintenance of our plugin. In our main PHP file, we simply need to include it to display our view:
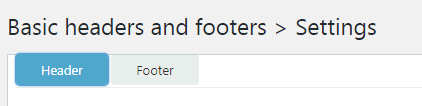
include_once( plugin_dir_path( __FILE__ ) . '/views/panel.php');In our configuration page, we add a title and create two tabs:
<!-- Title of our page -->
<h2>Basic Headers and Footers > Settings</h2>
<!-- Our two tabs -->
<div class="tab-menu">
<ul class="wpcr_nav_tabs">
<li><a href="#" class="tab-a active-a" data-id="tab-header">Header</a></li>
<li><a href="#" class="tab-a" data-id="tab-footer">Footer</a></li>
</ul>
</div>
<div class="tab tab-active" data-id="tab-header">
<!-- Content of the Header tab -->
</div>
<div class="tab" data-id="tab-footer">
<!-- Content of the Footer tab -->
</div>Here is the progress we have made so far:
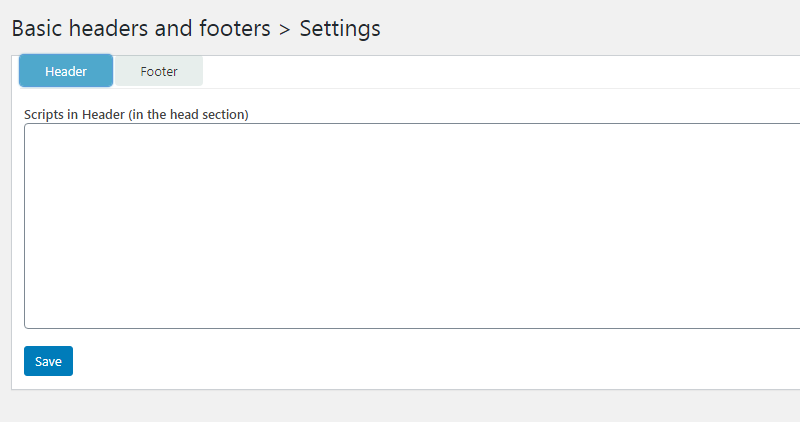
Next, we will add a form to update our configuration settings:
<!-- We need to specify the target plugin when submitting the form -->
<form action="options-general.php?page=basic-headers-and-footers" method="post">
    <!-- Form content -->

    <!-- Form submit button -->
    <input name="submit" type="submit" value="Save" class="button button-primary" />
</form>
In the form, we will add a textarea for each option:
<textarea name="bhaf_header" class="widefat" rows="10"></textarea>
...
<textarea name="bhaf_footer" class="widefat" rows="10"></textarea>
We will also add a nonce to secure our form (this will simply verify that the form submission is coming from our page):
<?php wp_nonce_field('basic-headers-and-footers', 'bhaf_nonce' ); ?>Now, let’s handle the configuration saving:
function adminPanel() {
    // Check access rights
    if ( ! current_user_can( 'manage_options' ) ) {
        return;
    }
    // If "submit" is set, the form has been submitted and we need to save the settings
    if (isset($_REQUEST['submit'])) {
        if (wp_verify_nonce($_REQUEST['bhaf_nonce'], 'basic-headers-and-footers')) {
            // Save the header code
            update_option('bhaf_header', stripslashes_deep($_REQUEST['bhaf_header']));
            // Save the footer code
            update_option('bhaf_footer', stripslashes_deep('bhaf_footer']));
        }
    }
    // Display the view
    include_once( $this->path . '/views/panel.php');
}
Let’s revisit our textareas, as we need to initialize them with the existing codes:
<textarea name="bhaf_header" class="widefat" rows="10"><?php echo esc_html(get_option('bhaf_header')); ?></textarea>The get_option function returns the value of our option.
Here is the final rendering of our configuration page:
Using wp_head and wp_footer Hooks
Now, all that’s left is to dynamically modify the header and footer of WordPress site pages based on the configured settings.
For this purpose, we will utilize the wp_head and wp_footer Hooks.
// Hook for the header
add_action('wp_head', 'injectHeader');

// Hook for the footer
add_action('wp_footer', 'injectFooter');

function injectHeader() {
    inject('bhaf_header');
}

function injectFooter() {
    inject('bhaf_footer');
}

function inject($section) {
    // Do not inject code on certain pages (such as robots.txt ...)
    if (is_admin() || is_feed() || is_robots() || is_trackback()) {
        return;
    }
    // Get the configured code
    $data = get_option($section);
    if (!empty($data)) {
        // Inject the code into the header/footer
        echo $data;
    }
}
Conclusion
The process of creating a WordPress plugin is straightforward and allows you to quickly create exciting functionalities.
In this tutorial, we have only covered a small portion of the possibilities offered by WordPress. I will write future articles on other features.
To enhance your skills, one effective technique is to examine and modify the code of existing extensions. It is recommended to start with plugins that have limited functionalities, as it allows you to quickly and easily review the relevant code.
For further exploration:


Leave a Reply