Audio-reactive visuals once required animation skills, coding, and costly software. That barrier is gone. No-code tools now convert sound into motion quickly and reliably. They also scale with minimal effort.
These tools analyze audio in real time. Beats trigger movement. Volume controls intensity. Frequency drives color and shape. The visuals respond instantly. The result feels dynamic without manual animation.
This guide explains how no-code audio-reactive visuals work. It also provides a clear, step-by-step process to create them.
Why audio-reactive visuals matter
Video platforms favor motion. Static visuals lose attention fast. Audio-reactive visuals fix this by syncing movement to sound automatically.
Musicians use them to promote tracks. Marketers use them for podcast clips, ads, and branded audio. Educators use them to improve lesson engagement. The use cases vary. The principle does not. Motion increases watch time.
Wyzowl reports that 91% of businesses use video as a marketing tool. Engagement drops when content feels flat or repetitive. Audio-reactive visuals keep content engaging without adding production complexity.
How no-code audio-reactive tools work
Behind the scenes, these tools perform signal analysis. Audio is broken into amplitude, tempo, and frequency ranges. Those values are then mapped to animation rules.
Amplitude controls how intense motion becomes. Tempo influences pacing and transitions. Frequency bands affect color, shape, or movement patterns.
No-code platforms hide this complexity. Users interact with templates, presets, and sliders instead of raw data. The system handles the math. The creator controls the look.
This abstraction is what makes these tools practical for non-technical users.
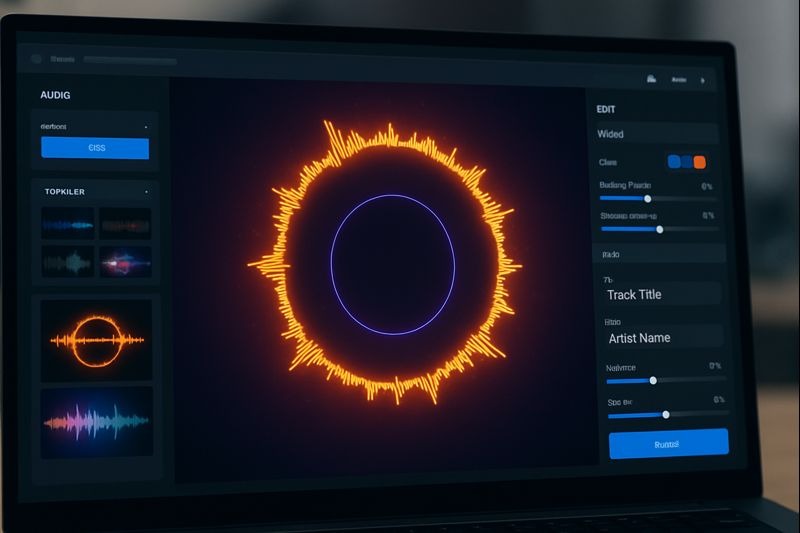
Videobolt: A production-ready no-code solution
Videobolt stands out because it combines audio analysis with production-grade output. It is built for creators who need reliable results across multiple formats.
Its visualizer system reacts directly to music structure. Motion stays in sync with beats. Energy shifts follow the track naturally. Visual behavior remains consistent across exports.
Creators use Videobolt’s music visualizer to generate looping visuals, promo clips, lyric animations, and streaming backgrounds. Rendering, timing, and formatting run automatically. This removes a major production bottleneck.
Consistency is the main advantage. The same rules produce reliable results at any scale.
Step-by-Step: Creating audio-reactive visuals with no-code tools
Step 1: Define the final format
Choose the destination before starting. YouTube requires 16:9. Reels and TikTok use 9:16. Feeds often perform best at 1:1. Format controls layout and motion density.
Step 2: Prepare clean audio
Export a clean audio file. Use WAV or a high-bitrate MP3. Avoid clipped peaks. Trim long silences at the start so the visual does not sit idle.
Step 3: Choose a no-code visualizer
Select a platform designed for audio-driven motion. Tools built for music promotion tend to handle beat detection and pacing more accurately.
Step 4: Upload the audio and generate a preview
Upload the track and let the system generate a first pass. Focus on timing and motion behavior, not design polish.
Step 5: Pick a template that fits the track
Fast genres benefit from sharper motion and contrast. Slower tracks usually look better with smoother transitions. Match the template to the energy of the audio.
Step 6: Adjust audio-reaction settings
Tune motion sensitivity and smoothing. Reduce sensitivity if visuals feel jittery. Increase intensity if motion feels flat. Small changes have a big impact.
Step 7: Lock colors, fonts, and layout
Use a limited color palette. Keep typography readable, especially on mobile. Maintain safe margins so text is not cropped on different platforms.
Step 8: Add branding carefully
Use high-resolution artwork. Avoid stretching logos. Subtle branding usually looks more professional than aggressive animation.
Step 9: Create a few variations
Generate two or three versions with small changes. This allows performance testing without rebuilding everything.
Step 10: Export with correct settings
Export in MP4 using H.264. Match resolution and aspect ratio to the platform. Consistency matters more than high bitrate.
Step 11: Review before publishing
Watch the full video. Check audio sync, transitions, and text clarity. Focus on the first two seconds, where drop-off is highest.
Step 12: Publish and measure
Track retention and replays. Use the top-performing version as the baseline for future visuals.
Why no-code tools scale better than custom builds
Custom systems offer flexibility. They also require development, maintenance, and debugging. No-code tools remove those costs.
They launch faster. They update automatically. They scale without added complexity. For most creators and teams, no-code tools are the better choice.
Consistency builds recognition
Templates act as constraints. Constraints create cohesion. Over time, consistent motion patterns and color systems become recognizable.
Audiences remember what looks familiar. That familiarity builds trust.
Final thoughts
Audio-reactive visuals are now a standard part of digital content workflows. No-code tools make them accessible without sacrificing quality or control.
Platforms like Videobolt demonstrate how automation and creative intent can coexist. As content demand increases and attention spans shrink, tools that turn sound into motion efficiently will remain essential.


Leave a Reply