Have you ever ordered a custom t-shirt or poster online and wondered how your photo gets transformed into a professional print file?
Behind the scenes, print-on-demand services use image transformation APIs to convert your regular smartphone photos into files that are ready for professional printing.
In this tutorial, we’ll build a simple React application that handles image uploads, validates print quality, converts RGB to CMYK, improves resolution to 300 DPI, and shows a clear print preview before checkout.
If you’re building a merch store, photo printing site, or any print-on-demand platform, understanding these image transformations helps you deliver better prints and avoid reprints.
Key takeaways
- Image transformation APIs automatically handle file changes needed for printing.
- RGB to CMYK conversion ensures colors look right on printed products.
- 300 DPI resolution is the industry standard for high-quality prints.
- Real-time validation catches quality issues before ordering.
- Bleed areas protect designs from unwanted white edges during cutting.
To apply these ideas correctly, we first need to understand what makes an image truly print-ready.
Understanding print-ready file requirements
Before we get into the code, let’s first understand what makes an image “print-ready”.
Color space: RGB vs CMYK
Digital screens use RGB colors (Red, Green, Blue) because they work with light. Printers use CMYK (Cyan, Magenta, Yellow, Black) because they print with ink on paper.
If an image is not converted properly, colors that look bright on screen may look dull or different in print. According to Adobe’s color modes guide, this conversion is important for good print results.
Resolution: 72 DPI vs 300 DPI
Images made for screens usually have a resolution of 72–150 DPI (dots per inch), which looks fine on phones and laptops.
For printing, 300 DPI is needed so the image looks sharp and not blurry. Low-DPI images can look pixelated when printed on paper.
Bleed area
A bleed area is extra space (typically 0.125 inches) added around the edges of a design. During cutting, small shifts can happen. Bleed prevents white edges when the cut isn’t perfectly aligned.
Now that we know the basics of print-ready images, let’s build a React app that checks and prepares images the right way.
Building a print-ready image upload flow in React
Let’s build the complete image upload and validation flow for a print-on-demand app. This includes uploading images, checking print quality, preparing print-ready files, and showing accurate previews.
Step 1: Setting up the React project
First, create a new React app using Vite and install the required dependency:
| npm create vite@latest image-transformation-api cd image-transformation-api npm install filestack-js |
Here, we’re using Filestack to handle image uploads and basic image transformations. This keeps the setup simple and lets us focus on preparing images for print instead of building upload logic from scratch.
With the project set up, the first step is to let users upload their images.
Step 2: Building the image upload component
Now, let’s create a component that lets users upload images using the Filestack JavaScript SDK:
| // src/components/ImageUploader.jsx import React, { useState, useEffect } from “react”; import * as filestack from “filestack-js”; function ImageUploader({ onImageUpload }) { const [client, setClient] = useState(null); // Replace with your actual Filestack API key const API_KEY = “YOUR_FILESTACK_API_KEY”; useEffect(() => { // Initialise Filestack client once on mount const filestackClient = filestack.init(API_KEY); setClient(filestackClient); }, []); const handleUploadClick = () => { if (!client) return; const pickerOptions = { accept: [“image/*”], // Only images maxFiles: 1, // One file at a time maxSize: 10 * 1024 * 1024, // 10MB limit uploadInBackground: false, onUploadDone: (result) => { if (result.filesUploaded && result.filesUploaded.length > 0) { const uploadedFile = result.filesUploaded[0]; onImageUpload(uploadedFile); } }, }; client.picker(pickerOptions).open(); }; return ( <div className=”uploader-container”> <button onClick={handleUploadClick} className=”upload-button” disabled={!client} > Upload Image for Printing </button> </div> ); } export default ImageUploader; |
This component creates a simple upload button that opens the Filestack picker when clicked. The picker only accepts image files and limits uploads to 10MB, which is a reasonable size for print-quality images.
Once an image is uploaded, the next step is understanding its real size so we can judge print quality accurately.
Step 3: Getting image dimensions for accurate print DPI
Before checking print quality, we first need the image’s actual pixel size.
Web images usually don’t have the correct DPI information. So instead of relying on DPI, we calculate it using the image’s pixel dimensions and the selected print size.
To get the correct width and height, we load the image once in the browser.
| // src/utils/getImageDimensions.js export const getImageDimensions = (imageUrl) => { return new Promise((resolve, reject) => { const img = new Image(); img.onload = () => resolve({ width: img.naturalWidth, // Actual width in pixels height: img.naturalHeight, // Actual height in pixels }); img.onerror = reject; img.src = imageUrl; }); }; |
This gives us accurate dimensions for calculating print DPI.
With the image dimensions available, we can now check whether the image is suitable for printing.
Step 4: Validating image quality
Now let’s create a validation function that checks if an image meets print standards:
| // src/utils/imageValidator.jsx export const validatePrintQuality = ( imageDimensions, printSizeInches, fileInfo ) => { const warnings = []; const errors = []; const { width, height } = imageDimensions || {}; const fileSize = fileInfo?.size || 0; // Ensure dimensions exist before continuing if (!width || !height) { return { isValid: false, errors: [“Image dimensions not available yet.”], warnings: [], calculatedDPI: null, }; } // Calculate DPI based on pixels and print size const dpiX = width / printSizeInches.width; const dpiY = height / printSizeInches.height; const calculatedDPI = Math.floor(Math.min(dpiX, dpiY)); // DPI checks if (calculatedDPI < 150) { errors.push( `Low print quality: ${calculatedDPI} DPI. Images under 150 DPI may appear blurry.` ); } else if (calculatedDPI < 300) { warnings.push( `Moderate print quality: ${calculatedDPI} DPI. 300 DPI is recommended for best results.` ); } // Format check const validFormats = [“image/jpeg”, “image/png”, “image/tiff”]; if (fileInfo?.mimetype && !validFormats.includes(fileInfo.mimetype)) { warnings.push(“Recommended formats for printing are JPEG, PNG, or TIFF.”); } // File size hint (not a strict rule) const minSize = 1 * 1024 * 1024; // 1MB if (fileSize && fileSize < minSize) { warnings.push( “File size is small. Image may lack detail for high-quality printing.” ); } return { isValid: errors.length === 0, warnings, errors, calculatedDPI, }; }; |
This validator checks three important things: whether the image meets the 300 DPI print standard, uses a print-friendly file format, and has a file size that suggests good quality. Real-time validation helps customers understand potential issues before placing orders.
After validating the image, the next step is preparing a print-ready version using image transformations.
Step 5: Applying image transformations with Filestack
Filestack lets you transform images using simple URLs. Here’s how you can prepare images for printing using these transformations.
| // src/utils/imageTransformer.jsx export const generatePrintReadyURL = (filestackHandle, options = {}) => { const { width = 2400, height = 3000, addBleed = true, format = “jpg”, quality = 100, } = options; // Base Filestack URL let transformURL = `https://cdn.filestackcontent.com/`; // Add transformations as URL segments const transformations = []; // 1. Resize to exact print dimensions transformations.push(`resize=width:${width},height:${height},fit:crop`); // 2. Enhance the quality for printing transformations.push(`sharpen=amount:2`); transformations.push(`enhance`); // 3. Convert to the appropriate format with maximum quality transformations.push(`output=format:${format},quality:${quality}`); // 4. Add bleed area (0.125 inches = 37.5 pixels at 300 DPI) if (addBleed) { const bleedPixels = 38; // Rounded up for safety transformations.push(`border=width:${bleedPixels},color:FFFFFF`); } // Combine transformations and add file handle const transformString = transformations.join(“/”); return `${transformURL}${transformString}/${filestackHandle}`; }; // Generate preview URL (lower quality for faster loading) export const generatePreviewURL = (filestackHandle, maxDimension = 800) => { return ( `https://cdn.filestackcontent.com/` + `resize=width:${maxDimension},height:${maxDimension},fit:max/` + `compress/` + `${filestackHandle}` ); }; |
These functions build transformation URLs that tell Filestack how to process the image. The print-ready version applies multiple transformations: resizing to the right size, sharpening for better clarity, keeping high quality, and adding a bleed area.
For simplicity, I’m applying these transformations on the client-side in this tutorial. Client-side processing works well for basic examples, but in real print-production systems, heavier image processing is often handled on the server. Filestack Workflows allow these same transformations to run automatically after upload, without slowing down the user’s browser.
As shown in a comparative study of print-production workflow systems, many print providers now rely on automated workflows to maintain consistent quality and reduce errors at scale.
Next, let’s show customers exactly how their final print will look before they place an order.
Step 6: Creating a canvas-based print preview
Next, let’s build a component that shows customers an accurate preview using HTML Canvas:
| // src/components/PrintPreview.jsx import React, { useEffect, useRef, useState } from ‘react’; function PrintPreview({ imageURL, printSize, showBleedGuides = true }) { const canvasRef = useRef(null); const [isLoading, setIsLoading] = useState(true); useEffect(() => { if (!imageURL || !canvasRef.current) return; const canvas = canvasRef.current; const ctx = canvas.getContext(‘2d’); const img = new Image(); img.crossOrigin = ‘anonymous’; img.onload = () => { // Set canvas dimensions based on print size const scale = 100; // pixels per inch for preview canvas.width = printSize.width * scale; canvas.height = printSize.height * scale; // Draw image ctx.drawImage(img, 0, 0, canvas.width, canvas.height); // Draw bleed guides if enabled if (showBleedGuides) { const bleedSize = 0.125 * scale; // 0.125 inches ctx.strokeStyle = ‘#ff0000’; ctx.lineWidth = 2; ctx.setLineDash([5, 5]); // Draw inner rectangle (trim line) ctx.strokeRect( bleedSize, bleedSize, canvas.width – (bleedSize * 2), canvas.height – (bleedSize * 2) ); // Add label ctx.font = ’12px Arial’; ctx.fillStyle = ‘#ff0000’; ctx.fillText(‘Trim Line’, bleedSize + 5, bleedSize + 15); } setIsLoading(false); }; img.onerror = () => { console.error(‘Failed to load preview image’); setIsLoading(false); }; img.src = imageURL; }, [imageURL, printSize, showBleedGuides]); return ( <div className=”preview-container”> <h3>Print Preview ({printSize.width}” × {printSize.height}”)</h3> {isLoading && <p>Loading preview…</p>} <canvas ref={canvasRef} style={{ maxWidth: ‘100%’, border: ‘1px solid #ccc’, display: isLoading ? ‘none’ : ‘block’ }} /> {showBleedGuides && ( <p className=”preview-note”> Red dashed line shows where the image will be trimmed. Design elements should not cross this line. </p> )} </div> ); } export default PrintPreview; |
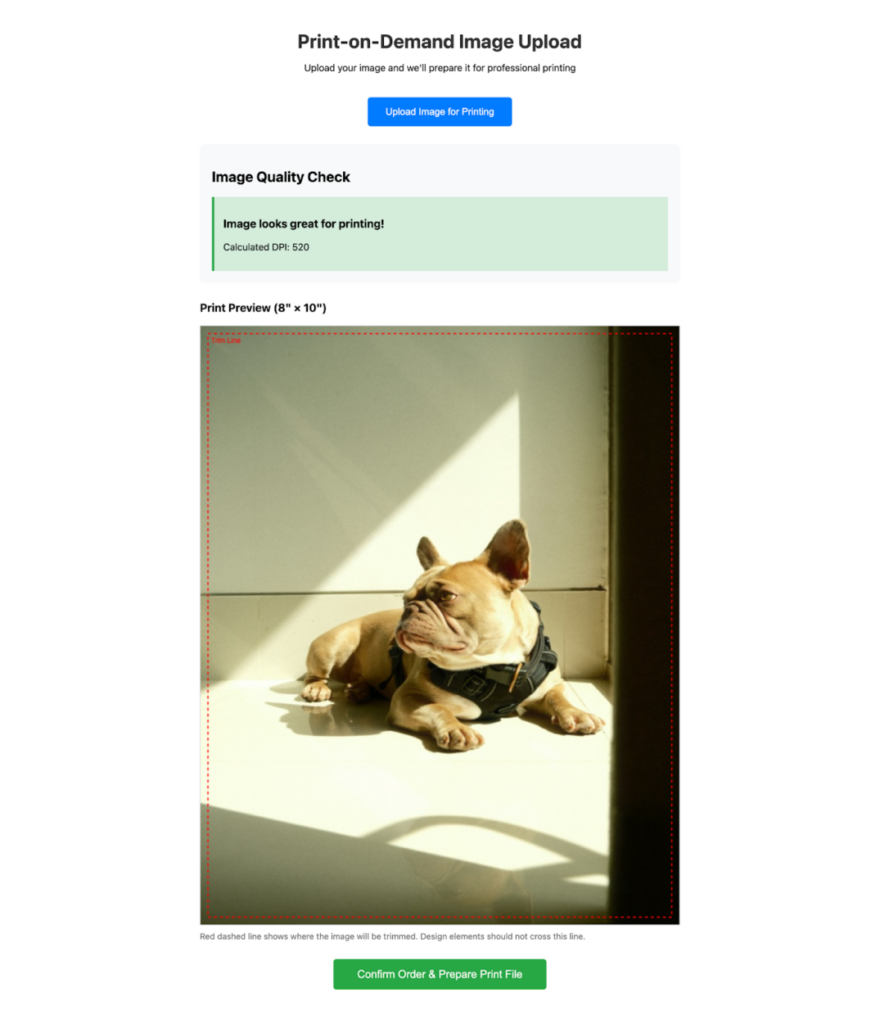
The canvas preview shows exactly how the final print will look, including clear guides for the bleed area. This helps customers see what they’ll get before placing the order.
Now that we have uploads, validation, transformations, and previews in place, let’s connect everything into a complete application.
Step 7: Putting everything together
Finally, we connect all components inside App.jsx and handle validation, previews, and print-ready URLs.
| // src/App.jsx import React, { useState } from “react”; import ImageUploader from “./components/ImageUploader”; import PrintPreview from “./components/PrintPreview”; import { getImageDimensions } from “./utils/getImageDimensions”; import { validatePrintQuality } from “./utils/imageValidator”; import { generatePrintReadyURL, generatePreviewURL, } from “./utils/imageTransformer”; import “./App.css”; function App() { const [uploadedFile, setUploadedFile] = useState(null); const [validation, setValidation] = useState(null); const [printSize] = useState({ width: 8, height: 10 }); // 8×10 inches const handleImageUpload = async (fileInfo) => { setUploadedFile(fileInfo); setValidation({ isValid: false, warnings: [], errors: [“Checking image quality…”], calculatedDPI: null, }); try { // Get real pixel dimensions from the image const dimensions = await getImageDimensions(fileInfo.url); // Validate using dimensions + print size const validationResult = validatePrintQuality( dimensions, printSize, fileInfo ); setValidation(validationResult); } catch (err) { setValidation({ isValid: false, warnings: [], errors: [“Unable to read image dimensions.”], calculatedDPI: null, }); } }; const handleConfirmOrder = () => { if (!uploadedFile) return; // Generate final print-ready file URL const printReadyURL = generatePrintReadyURL(uploadedFile.handle, { width: printSize.width * 300, // 300 DPI height: printSize.height * 300, addBleed: true, format: “jpg”, quality: 100, }); console.log(“Print-ready file URL:”, printReadyURL); alert(“Order confirmed! Your print-ready file is being prepared.”); // In a real application, you would send this URL to your backend // for order processing and printing }; return ( <div className=”App”> <header> <h1>Print-on-Demand Image Upload</h1> <p>Upload your image and we’ll prepare it for professional printing</p> </header> <main> <ImageUploader onImageUpload={handleImageUpload} /> {uploadedFile && ( <div className=”results-section”> <div className=”validation-panel”> <h2>Image Quality Check</h2> {validation?.errors.length > 0 && ( <div className=”error-messages”> <h3>Errors (Must Fix):</h3> <ul> {validation.errors.map((error, index) => ( <li key={index}>{error}</li> ))} </ul> </div> )} {validation?.warnings.length > 0 && ( <div className=”warning-messages”> <h3>Warnings:</h3> <ul> {validation.warnings.map((warning, index) => ( <li key={index}>{warning}</li> ))} </ul> </div> )} {validation?.isValid && validation?.warnings.length === 0 && ( <div className=”success-message”> <h3>Image looks great for printing!</h3> <p>Calculated DPI: {Math.round(validation.calculatedDPI)}</p> </div> )} </div> <PrintPreview imageURL={generatePreviewURL(uploadedFile.handle)} printSize={printSize} showBleedGuides={true} /> <button onClick={handleConfirmOrder} disabled={!validation?.isValid} className=”confirm-button” > Confirm Order & Prepare Print File </button> </div> )} </main> </div> ); } export default App; |
Now start the app using npm run dev. This is what the application looks like when it’s running.
Not print-ready image:

Print-ready image:
Taking It Further
Once you have the basics working, you can improve the app with these ideas:
- Multiple print sizes: Let customers choose sizes like 5×7, 8×10, or 11×14, and update the quality checks for each size.
- Material selection: Support different print materials such as canvas, photo paper, or metal, each with its own rules.
- Batch uploads: Allow customers to upload multiple images at once for photo books or poster collections.
- AI enhancement: Use AI tools to safely improve low-resolution images before printing.
- Better color handling: Improve CMYK conversion with proper color profiles for more accurate prints.
- Real-time cost calculation: Show printing prices instantly based on image size and selected material.
Best Practices
Here are a few tips to help you get better print results in print-on-demand apps.
- Set clear expectations early: Tell customers the minimum image size before they upload. For example, mention that an 8×10 print needs at least 2400×3000 pixels. This avoids confusion later.
- Provide visual feedback: Use a canvas preview with bleed guides. Visuals are easier to understand than printing terms, especially for first-time users. A before-and-after view can help even more.
- Save original files: Always save the original file that users upload. If something goes wrong during printing, you can reprocess it without asking them to upload again.
- Test different image formats: Images come from many sources and formats (JPEG, PNG, TIFF, etc.). According to printing-industry guides, using the right file format helps ensure high-quality, reliable prints.
- Handle errors gracefully: Slow networks, broken files, or upload limits can happen. Clear error messages and retry options give users a much better experience than silent failures.
Along with best practices, it’s equally important to know what can go wrong.
Common Pitfalls
Here are some common mistakes that can happen when building print-on-demand apps, and what to check before launching.
- Assuming all images use RGB colors: Not every image starts in RGB. Some cameras use CMYK or other color profiles. Always check the color space before converting to avoid mistakes.
- Ignoring aspect ratio differences: A wide photo (16:9) won’t fit perfectly into an 8×10 print. Cropping is required, so make sure users can see what parts of the image will be cut off.
- Only using client-side processing for large files: Very large images can slow down or crash the browser. For heavy processing, it’s better to move work to the server using workflows.
- Forgetting mobile users: Large uploads take time on mobile networks. Show upload progress and support resume options so users don’t feel stuck.
- Skipping validation after transformations: Transforming an image doesn’t guarantee it’s print-ready. Always check the final output to catch quality or processing issues early.
Keeping these pitfalls in mind helps create a smoother and more reliable print experience.
Conclusion
Building a print-ready image transformation system means caring about both technical details and user experience. By validating images early, showing clear previews, and handling complex changes with an image transformation API like Filestack, you can avoid bad prints and unhappy customers.
The goal is to balance automation and clarity. Do the hard work in the background, but always show users what their final print will look like and explain any quality issues clearly.
Print-on-demand is built on trust. When customers can see accurate previews, understand limits, and feel confident their image is ready for printing, they are more likely to place orders and come back.
Whether it’s t-shirts, photo prints, or promo products, early validation, smart transformations, and clear previews are the base of a reliable print workflow.
About the Author
Shefali Jangid is a web developer, technical writer, and content creator with a love for building intuitive tools and resources for developers.
She writes about web development, shares practical coding tips on her blog shefali.dev, and creates projects that make developers’ lives easier.


Leave a Reply