On Docker Hub, the list of available images is vast, making it easy to create containers from these images.
However, there are times when we need to create our own image. There are several solutions available to us for creating a customized image:
- Creating an image from a container: We customize a container based on its writable layer and create a new image from that container.
- Creating an image from a Dockerfile.
In this tutorial, we will focus on creating an image from a Dockerfile. I will cover the writable layer of containers in a separate article.
What is a Dockerfile?
A Dockerfile is simply a configuration text file used to create an image. It contains all the necessary instructions for building an image.
This format has several advantages. It enables easy versioning of the image since it is a simple text file, and it also provides a quick overview of the operations performed.
Dockerfile Instructions
A Dockerfile contains a list of instructions. Here are the basic instructions that we will be using throughout this article:
| Instruction | Description |
|---|---|
| FROM | Image source |
| RUN | Command to be executed to build the image |
| COPY | Add a file to the image |
| WORKDIR | Change the current directory |
| EXPOSE | Ports to be listened on by the container by default |
| CMD | Command to be executed when the container starts up |
This list is not exhaustive, and I would direct you to the official documentation for a complete reference: Dockerfile reference.
My First Dockerfile
Let’s see how to create an image that runs a web application based on Express.js (a minimalist framework for building web applications with Node.js).
A Dockerfile always begins with the FROM instruction, which indicates the base image we will use. We will start with a Ubuntu Linux distribution:
FROM ubuntu:20.04It is possible to start from scratch by using “FROM scratch”.
Next, we will use the RUN instruction to execute commands in our container.
We will install Node.js, install npm (useful for installing Express.js), create a folder for our web application, and finally install Express.js:
RUN apt-get update \
	&& apt-get install -y nodejs \
	&& apt-get install -y npm \
	&& mkdir myapp && cd myapp && npm init -y && npm install express
Each instruction in a Dockerfile results in the creation of a layer.
The number of layers impacts the size of the images, so here we limit the number of instructions by executing multiple commands within a single RUN instruction.
Note: The maximum number of layers is limited to 128.
Our goal is to create a small and pointless web application in Node.js that simply returns “Hello World!” hardcoded:
const express = require('express')
const app = express()
const port = 80

app.get('/', (req, res) => {
  res.send('Hello World!')
})

app.listen(port, () => {
  console.log(`Up`)
})
We will add this file to the image:
COPY app.js /myapp/app.jsNext, we will change the current directory:
WORKDIR /myappWe will set the listening port for our application:
EXPOSE 80In itself, EXPOSE doesn’t do anything at the image level, but it serves two purposes:
Documentation: People who view the Dockerfile can know which ports they need to map.
“docker run” command with automatic port mapping (“-P” option): The command can automatically retrieve the ports to be mapped.
Lastly, we specify the command to be executed when containers created from our image start up. In our case, we launch our application app.js:
CMD ["node", "app.js"]Here is our complete Dockerfile:
FROM ubuntu:20.04

RUN apt-get update \
	&& apt-get install -y nodejs \
	&& apt-get install -y npm \
	&& mkdir myapp && cd myapp && npm init -y && npm install express

COPY app.js /myapp/app.js

WORKDIR /myapp

EXPOSE 80

CMD ["node", "app.js"]
Our Dockerfile is already written! Now, all that’s left is to create our image using the “docker build” command:
docker build -t cyrilbois/mywebapp:latest .The “-t” option allows us to specify the name (and tag) of our image.
Our image is finally created! 😊
If we want to create a container from our image:
docker run -d -p 3000:80 --name webapp cyrilbois/mywebapp:latestNow, we can access our web application:
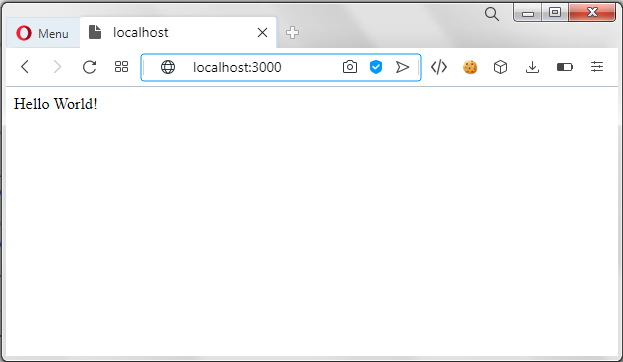
And there you have it! I hope this tutorial was helpful.


Leave a Reply